

From Nailing to Gluing
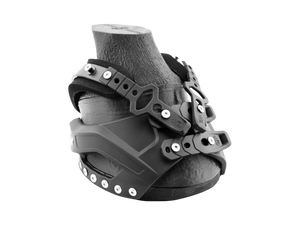
Ufa (26 years) and Magic (12 years) live outdoors all year round on the paddock or on the winter paddock with open stable. Shoeing with iron was done by a very good farrier friend. Nevertheless, there were always problems: gelding Magic always had to be sedated with paste for shoeing; despite this he was very restless, especially when it took a bit longer (sedation wearing off). After long shoeing periods (8 weeks) the wall had grown well, but at the front a flat hoof developed and a slight hollow wall on the sides – especially on the outside. Mare Ufa probably has arthritis at the back, so she became more and more afraid of being shod. This increased more and more, so that there was already restlessness before the nailing. Generally I have to say, however, that the shoeing, when it wasn't on for so long, held well and did not cause any further complications. Since we are often out on gravel field paths, going barefoot is not an option. In November 2022 our farrier was unavailable and we were forced to help ourselves. First Ufa was glued with Goodsmith, and then Magic in January. Both glue-ons lasted about 6 to 8 weeks. Since then, with more or less success, I have only been gluing. The holding time has ranged from 1 day.
The gluing for each horse, including hoof trimming, takes about 1 to 1.5 hours – depending on the condition of the hooves. Now I remove the old glue-ons and trim the hoof almost completely, but leave enough so that both can still go barefoot for a few days (depending on the season). That is also better when they are restless. The hoof wall has clearly improved in both (no nails) and in Magic's front hooves the arch has improved.
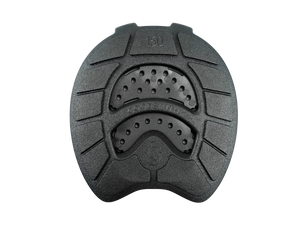
When riding on the tarmac road to the forest, the plastic covering is clearly better. However, small stones from the field path can slide under the hoof from behind.
Conclusion: 1. When working, make sure the tools, gloves etc. are absolutely free of grease. 2. Trim similarly to barefoot. 3. Always carefully rasp off glue residues. 4. Directly before gluing, completely remove the “patina” with new sanding sponges and then immediately degrease. 5. Roughen and degrease the tabs. 6. Always glue the middle tab on each side first with the hoof raised, so that the tabs do not slip when the horse repositions itself. 7. Glue: less is more. 8. Before gluing, after welding on, slightly flatten the tops of the tabs (at the front as close together as possible – leaving about one tab's width of space, and always 4 per side), so that no long grass can get caught there. 9. After gluing, apply a little glue / Filler on top – see above, long grass. 10. From about 4 to 5 weeks the rearmost tab in front of the widest point of the hoof comes off. I then nip it off. This is the sign that the hoof has grown so much that the “shoe is pinching”. Depending on hoof growth and climate (wet/dry) this can take between 4 and 8 weeks. If the hoof is correctly glued and worked, it will indicate that the next gluing is due. 11. Toe clips have not proven effective; the hoof pushes itself over them under heavy load. Better is (see above) a small gap at the front between the first tabs.
The new tabs stick better, but they too still need to be sanded and roughened. Plates I use twice (about 10 weeks); tabs I always use new ones, unless the glue-on came off after a short time. The sanding/sawing of the plates produces disturbing dust. A small saw and a sanding block – both with dust extraction – are useful.